In this article, I show you How to convert website to android app. It really is not complicated. Here I will show you the easiest way to convert your website into an Android app using Android Studio.
Let’s see how we can do it. So first of all the prerequisite is that you must have a website of course and it must be a responsive website. here is one of the best software service company discretemicros.com
Now, how we can convert this website into an Android application. First of all open your Android Studio.
Open your Android studio and create a new Android project and give your project a name. I’m going to name it iTSAHC and click Next.
Now, I’m going to leave everything as the default. You can choose the old or the latest version. but it may not be compatible with every device you know. so I prefer to use a jelly 4.1 that covers 73% or 78% of the devices.
Now click Next and choose the blank activity, click Next and believe that everything is default.
If you want you can change the name of your main activity but I don’t want this. so I will click finish. Now our project is created.
Page Contents
How to convert website to android app in simple way
Now the First thing was the extra padding. If you want to remove this extra padding from here go to your Activity_Main.XML file and here at the top there are some properties related to these padding. You may see this padding here that is left padding, right padding, top and bottom Padding.
You can see TestView. These code you have to delete it all from testview.
Below that you can this code
</androidx.constraintlayout.widget.ConstraintLayout>
Here you have to replace the code as like
</RelativeLayout>
The Second thing we are going to do is in the palette section, here we will search for the web view. If you are not seeing Webview the find code on the right top corner and click over there. Here you can see search box. Search for a webview, then drag and drop on your activity here.
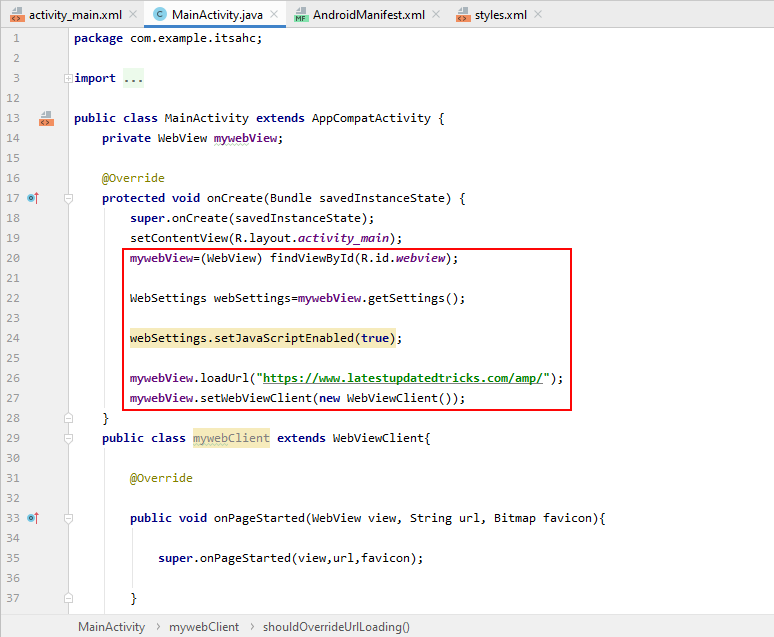
The next step is to go to your Java folder and open your MainActivity.Java and here, first of all, let’s declare a webview variable.
Copy and paste the code from my website
mywebView=(WebView) findViewById(R.id.webview);

WebSettings webSettings=mywebView.getSettings();

webSettings.setJavaScriptEnabled(true);

mywebView.loadUrl("https://www.latestupdatedtricks.com/amp/");

So just write private web view so just search for webview and give a name to its for example web view and now once you have created your variable just copy your variable and go to your oncreate method here and just here just paste your webview and then we are going to call this webview by you know casting it so what we need to do just give a bracket here. Then just write webview and then after outside the bracket just write findViewById .
So it will find your component using your ID and then just write R.id.webview which is a webview in our case.
Now here you may be confused because your component ID is also webview and your private variable is also web with the same spelling. so for example i can change it to mywebView . so it’s clear which is what.
Now the Third thing is to create a variable one more variable that is WebSettings and simply name it as webSettings=mywebView and then just take your mywebview and then call a method called mywebView.getSettings()
The next step is to take your webSettings from here and then call a method called setJavaScriptEnabled(true); and what you are going to do is enable JavaScript in your webview. Therefore, every time you use a website that uses JavaScript, it will be supported.
How to convert website into android app in android studio
Now the next step is to take your webview variable which is mywebView in my case and then call a method called loadUrl and in double quotes, give your website url, so i will just copy my website url from here and I will paste it in between the double quotes.
mywebView.loadUrl("https://www.latestupdatedtricks.com/amp/");
Next Need to click on import … . under import android.os.Bundle;
Here you need to paste below code.
import android.webkit.WebSettings;

import android.webkit.WebView;

import android.webkit.WebViewClient;
Once done, under public class MainActivity extends AppCompatActivity { again copy and paste below code.
private WebView mywebView;
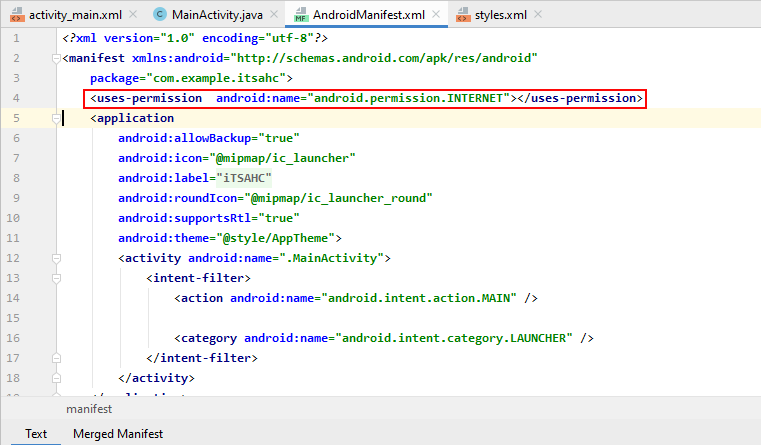
Now, whenever you use webview to give your device permission to use the internet, you need to change the manifest file from here. go to the manifest folder and open the Androidmanifest.XML file from here and here at the top, you can create one more element here which is
<uses-permission android:name="android.permission.INTERNET"></uses-permission>

You can use this user’s permission attribute here and then you just have to choose the permission that we want to allow, so in our case we want to choose an Android internet permission, so just search for this Android internet permission and then close your element.
Now, one more step we have to take to make this application fully functional. Or, each time we click on any link in this application, it will be redirected to the default browser you have on your mobile device.
Let’s see how we can do these things to solve the first problem we are going to go to once again to a MainActivity.Java file.
Copy and paste all this code into MainActivity.Java
mywebView.setWebViewClient(new WebViewClient());
How to convert website into android app in android studio
here we will take over mywebview variable and then we will call a method called set webviewclient and then we will just call a new webview client and what this line of code will do is it’s going to prevent your URLs from opening in the browser. so whenever your app is open and when you click some link it’s not going to open this link in the web browser.
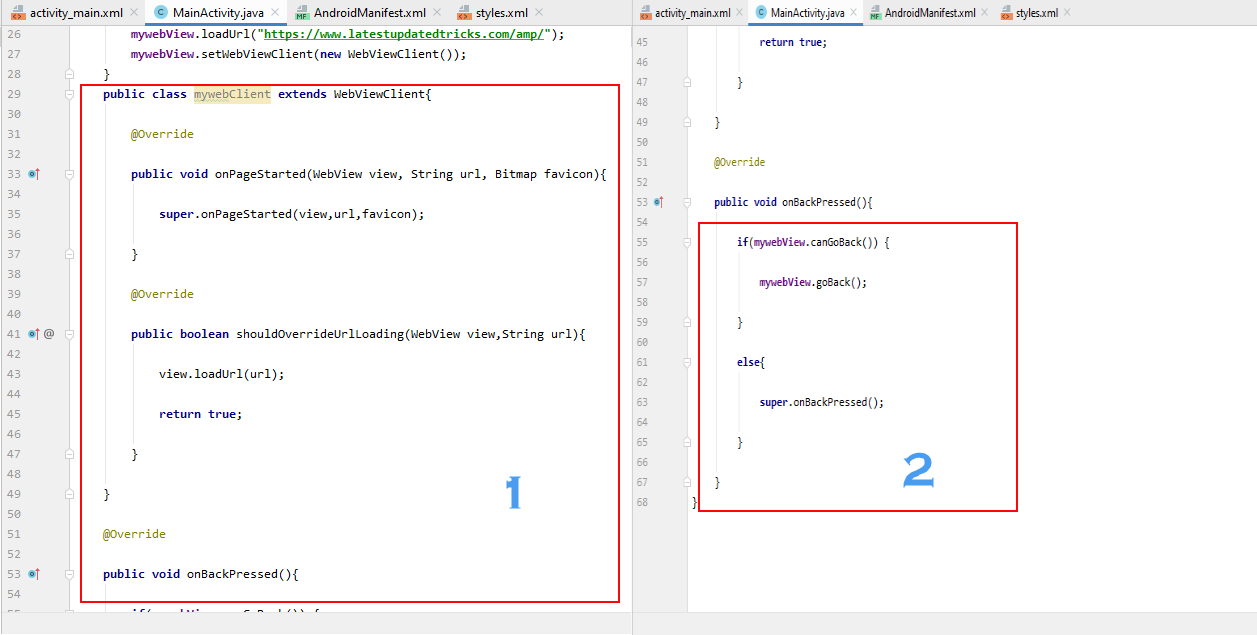
Now Copy all the below codes after. It will functional the back button.
public class mywebClient extends WebViewClient{

        @Override

        public void onPageStarted(WebView view, String url, Bitmap favicon){

            super.onPageStarted(view,url,favicon);

        }

        @Override

        public boolean shouldOverrideUrlLoading(WebView view,String url){

            view.loadUrl(url);

            return true;

        }

    }

@Override

    public void onBackPressed(){

        if(mywebView.canGoBack()) {

            mywebView.goBack();

        }

    else{

        super.onBackPressed();

            }

 }
Now the third Step was the extra padding. If you want to remove this extra padding from here go to your Activity_Main.XML file and here at the top there are some properties related to these padding. You can see this padding here that is left padding, right padding, top and bottom Padding.
and here in Activity_Main.XML under WebView paste below code.
android:id="@+id/webview"
Now click on Built form the navigation bar, then select Generate signed bundle / APK
Then a small window will pop up. Here you have to check APK and click on Next.
Now click on Create New
Here you have to select the path and give file name, Password, also fill all your details and keep Alias as key0.
Now click on OK
Then Click Next
Here you have to select release and click on Finish.
Thats it. Once app created. You will get a notification that successfully created.
Now you can see a link namely locate.
click on it. Now you can see the app which you created in a folder open. From here you can copy the app and install on your android device.


